пятница, 23 ноября 2018 г.

Regex matching in a Bash if statement

 Source
 
#!/bin/bash

# Only continue for 'develop' or 'release/*' branches
BRANCH_REGEX="^(develop$|release//*)"

if [[ $BRANCH =~ $BRANCH_REGEX ]];
then
    echo "BRANCH '$BRANCH' matches BRANCH_REGEX '$BRANCH_REGEX'"
else
    echo "BRANCH '$BRANCH' DOES NOT MATCH BRANCH_REGEX '$BRANCH_REGEX'"
fi

вторник, 23 октября 2018 г.

How to Rebuild Corrupted RPM Database in CentOS

Source

The RPM database is made up of files under the /var/lib/rpm/ directory in CentOS and other enterprise Linux distributions such as RHEL, openSUSE, Oracle Linux and more.
If the RPM database is corrupted, RPM will not work correctly, thus updates cannot be applied to your system, you encounter errors while updating packages on your system via YUM package manager. The worst case scenario is being unable to run any rpm and yum commands successfully.
Read Also: 20 Practical Examples of RPM Command in Linux
There are a number of factors that can lead to the RPM database corruption, such as incomplete previous transactions, installation of certain third-party software, removing specific packages, and many others.
In this article, we will show how to rebuild a corrupted RPM database; this way you can recover from an RPM database corruption in CentOS. This requires root user privileges, otherwise, use the sudo command to gain those privileges.

Rebuild Corrupted RPM Database in CentOS

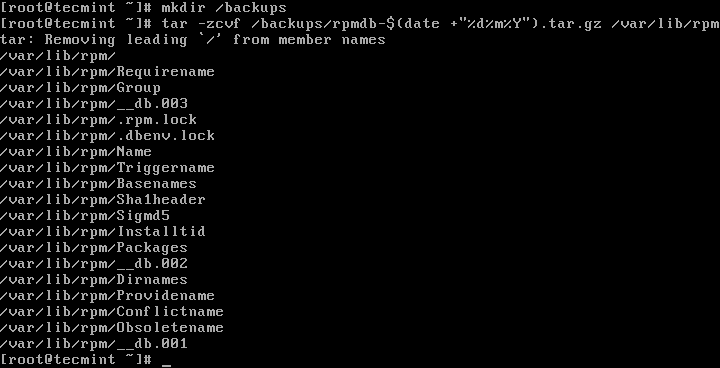
First start by backing up your current RPM database before proceeding (you might need it in the future), using the following commands.
# mkdir /backups/
# tar -zcvf /backups/rpmdb-$(date +"%d%m%Y").tar.gz  /var/lib/rpm
Backup RPM Database
Backup RPM Database
Next, verify the integrity of the master package metadata file /var/lib/rpm/Packages; this is the file that needs rebuilding, but first remove /var/lib/rpm/__db* files to prevent stale locks using following commands.
# rm -f /var/lib/rpm/__db*  
# /usr/lib/rpm/rpmdb_verify /var/lib/rpm/Packages
Verify RPM Database
Verify RPM Database
In case the above operation fails, meaning you still encounter errors, then you should dump and load a new database. Also verify the integrity of the freshly loaded Packages file as follows.
# cd /var/lib/rpm/
# mv Packages Packages.back
# /usr/lib/rpm/rpmdb_dump Packages.back | /usr/lib/rpm/rpmdb_load Packages
# /usr/lib/rpm/rpmdb_verify Packages
Dump and Load RPM Database
Now to check the database headers, query all installed packages using the -q and -a flags, and try to carefully observe any error(s) sent to the stderror.
# rpm -qa >/dev/null #output is discarded to enable printing of errors only
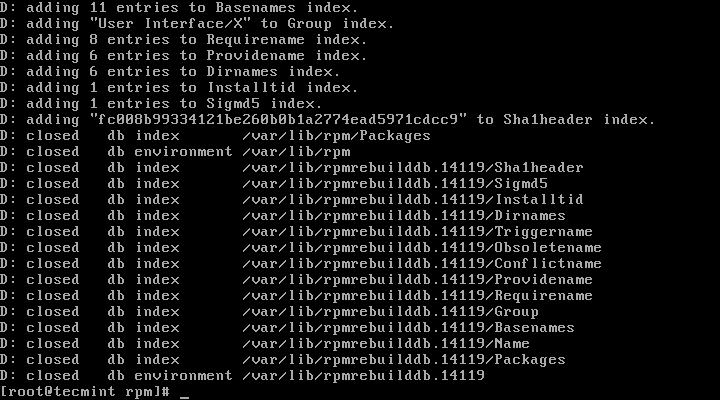
Last but not least, rebuild the RPM database using the following command, the -vv option allows for displaying lots of debugging information.
# rpm -vv --rebuilddb
Rebuild RPM Database

Use dcrpm Tool to Detect and Correct RPM Database

We also discovered the dcrpm (detect and correct rpm) command line tool used to identify and correct well known issues to do with RPM database corruption. It is a simple and easy-to-use tool which you can run without option. For effective and reliable usage, you should run it regularly via cron.
You can install it from source; download the source tree and install it using setup.py (which should grab the psutil dependency from pypi as well), as shown.
# git clone https://github.com/facebookincubator/dcrpm.git
# cd dcrpm
# python setup.py install
Once you have installed dcrpm, run it as shown.
# dcrpm
Finally, try to run your failed rpm or yum command again to see if everything is working fine.
dcrpm Github repository: https://github.com/facebookincubator/dcrpm
You can find more information from RPM database recovery page.
That’s all! In this article, we have explained how to rebuild a corrupted RPM database in CentOS. To ask any questions or share your thoughts about this guide, use the feedback form below.

How to rescan disk in Linux after extending disk

 Source

How to rescan disk in Linux after extending vmware disk


Learn to rescan disk in Linux VM when its backed vdisk in vmware is extended. This method does not require downtime and no data loss.
Rescan disk when vdisk in extended
Re-scan vdisk in Linux


Sometimes we get a disk utilization situations and needs to increase disk space. In vmware environment, this can be done on the fly at vmware level. VM assigned disk can be increased in size without any downtime. But, you need to take care of increasing space at OS level within VM. In such scenario we often think, how to increase disk size in Linux when vmware disk size is increased? or how to increase mount point size when vdisk size is increased? or steps for expanding LVM partitions in vmware Linux guest? or how to rescan disk when vdisk expanded? We are going to see steps to achieve this without any downtime.
In our example here, we have one disk /dev/sdd assigned to VM of 1GB. It is part of volume group vg01 and mount point /mydrive is carved out of it. Now, we will increase size of disk to 2GB at vmware level and then will add up this space in mount point /mydrive.

Step 1:

See below fdisk -l output snippet showing disk /dev/sdd of 1GB size. We have created single primary partition on it /dev/sdd1 which in turns forms vg01 as stated earlier. Always make sure you have data backup in place of the disk you are working on.

Step 2:

Now, change disk size at vmware level. We are increasing it by 1 more GB so final size is 2GB now. At this stage disk need to be re-scanned in Linux so that kernel identifies this size change. Re-scan disk using below command :
Make sure you use correct disk name in command (before rescan). You can match your SCSI number (X:X:X:X) with vmare disk using this method.
Note : Sending “– – -” to /sys/class/scsi_host/hostX/scan is scanning SCSI host adapters for new disks on every channel (first -), every target (second -), and every device i.e. disk/lun (third -) i.e. CTD format. This will only helps to scan when new devices are attached to system. It will not help us to re-scan already identified devices.
Thats why we have to send “1” to /sys/class/block/XYZ/device/rescan to respective SCSI block device to refresh device information like size. So this will be helpful here since our device is already identified by kernel but we want kernel to re-read its new size and update itself accordingly.
Now kernel re-scan disk and fetch its new size. You can see new size is being shown in your fdisk -l output.

Step 3:

At this stage our kernel know new size of disk but out partition (/dev/sdd1) is still of old 1GB size. This left us no choice but delete this partition and re-create it again with full size. Make a note here your data is safe and make sure your (old & new) partition are marked as Linux LVM using hex code  8e or else your will mess up whole configuration.
Delete and re-create partition using fdisk console as below:
All fdisk prompt commands are highlighted in above output. Now you can see new partition /dev/sdd1 is of 2GB size. But this partition table is not yet written to disk. Use w command at fdisk prompt to write table.
You may see warning and error like above. If yes, you can use partprobe -s and you should be good. If you still below error with partprobe then you need to reboot your system (which is sad ).

Step 4:

Now rest of the part should be tackeled by LVM. You need to resize PV so that LVM identify this new space. This can be done with pvresize command.
As new PV size is learned by LVM you should see free/extra space available in VG.
You can see our VG now have 2GB space i.e. what we have resized our disk to! Now you can use this space to create new lvol in this VG or extend existing lvol using LVM commands. Further you can extend filesystem online which is sittign on logical volumes.
You can observe all lvol in this VG will be un-affected by this activity and data is still there as it was previously.
Shell
1
2
3
4
5
6
7
8
 
# ll /mydrive
total 24
drwx------.  2 root root 16384 Jun 23 11:00 lost+found
-rw-r--r--.  1 root root     0 Jun 23 11:01 shri
drwxr-xr-x.  3 root root  4096 Jun 23 11:01 .
dr-xr-xr-x. 28 root root  4096 Jun 23 11:04 ..
 

вторник, 18 сентября 2018 г.

KRDC send ctrl+alt+delete to remote host

source
Maybe beating a dead horse here but since this jumps at the top of the list in search posting my findings here.
It may be a bug but it still works for me:

1) press Alt and hold
2) move the mouse out of the krdc window
3) release Alt
4) move mouse back into the window
5) press Ctrl+Del

четверг, 23 августа 2018 г.

How to extend the timeout for services if they fail to start or stop

Problem:

Services cannot be started or stopped.

Solution:

In some environments, applications installed as Windows services may require more time to start or stop. Click on the links below to learn how to change the timeout for service applications in Windows.

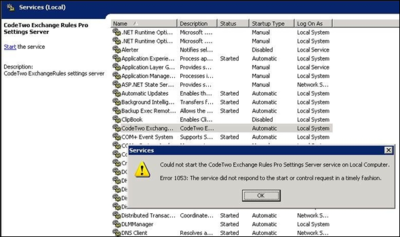
A service is unable to start on its own and times out

To avoid the service startup problem (Fig. 1.), you can:
228-0
Fig. 1. A service does not start and times out.

How to delay the automatic start of a service application

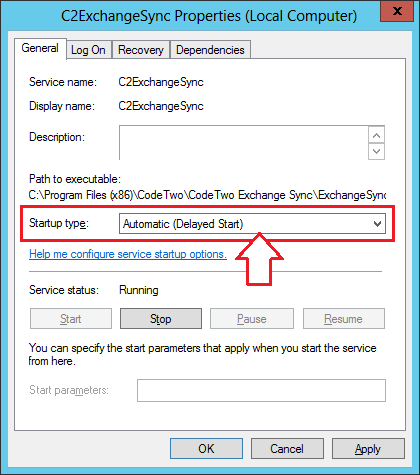
If a service's start is delayed, this service attempts to start only if critical system services have already started. To configure your service this way, you need to:
  1. Run Windows Services manager (launch services.msc from the Start menu).
  2. Right-click on the service you would like to configure, and select Properties.
  3. On the General tab, change the Startup type to Automatic (Delayed Start), as shown in Fig. 2. for Exchange Sync.
228-2
Fig. 2. Selecting the startup type of a service.

How to increase the timeout value for the service startup

Additionally, you can change the timeout value for the service startup in the Windows registry:
  1. Launch Windows Registry Editor.
  2. Find the following registry subkey:
    HKEY_LOCAL_MACHINE\SYSTEM\CurrentControlSet\Control
  3. Right-click this key and select NewDWORD (32-bit) Value.
  4. A new value named New Value #1 appears on the right.
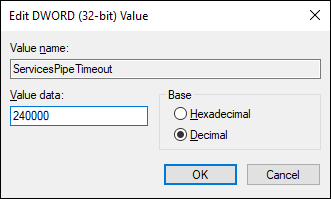
  5. Change the name of this new value to ServicesPipeTimeout.
  6. Right-click the ServicesPipeTimeout value you created, and choose Modify. The Edit DWORD Value window opens.
  7. Change Base to Decimal.
  8. In the Value data field, type the value (in milliseconds) of time allowed for the service to start, and click OK.
    Info
    In our test environment, we set the value (Fig. 3.) to 240000 ms (4 minutes), and this enabled the service to start correctly. It is permissible to set a higher value - it should not have any impact on performance.
    228-3
    Fig. 3. Setting a new timeout value.
  9. Finally, restart the machine.

A service does not stop

If the problem happens for the first time and you are not able to close the service from within Windows Services manager (services.msc) or Task Manager, you can kill the service using the taskkill command. See this Knowledge Base article for details.
If the problem occurs frequently, follow the steps below to extend the service closing timeout:
  1. Launch Windows Registry Editor.
  2. Locate this registry subkey:
    HKEY_LOCAL_MACHINE\SYSTEM\CurrentControlSet\Control
  3. Right-click this key and choose New > DWORD (32-bit) Value.
  4. A new value named New Value #1 appears in the right pane.
  5. Rename the new value to WaitToKillServiceTimeout.
  6. Right-click the value and select Modify. The Edit DWORD Value window pops up.
  7. Change Base to Decimal.
  8. In the Value data field, type the value (in milliseconds) of time allowed for the service to stop, and confirm by clicking OK.
    Info
    By default, Windows waits 20000 ms, so you might need to set a higher value.
  9. Finally, restart your machine.

вторник, 31 июля 2018 г.

Убрать ^M в конце строк текстового файла


dos2unix filename
sed -i 's/\r$//' filename
sed -i 's/\r//g' file
find . -type f -name '*.php' -exec sed -i -r 's/\r$//g' {} \; - то же самое, но для всех файлов .php в поддиректориях.

среда, 25 июля 2018 г.

Nginx Rewrite Rule Examples with Reg-Ex and Flags

Source.

Ability to change (rewrite) incoming URL into a different URL based on your criteria is an essential feature for any webserver.
Nginx rewrite is very powerful and flexible.
In this tutorial, we’ll explain the following examples on nginx rewrite:
  1. Nginx Rewrite Example Using $1, $2, ..
  2. Creating Controller File Using Nginx Rewrite
  3. Rewrite Break Flag in Location Context
  4. Adding Question Mark to Nginx Rewrite Replacement String
  5. If Context and Rewrite Directive
  6. Nginx Rewrite Flags Examples
  7. Capture Nginx Rewrite Hits in Error Log File

The following is the syntax of nginx rewrite:
rewrite reg-ex replacement [flag];
In the above:
  • rewrite directive is part of the ngx_http_rewrite_module module.
  • reg-ex – This is a PCRE regular expression that you’ll specify here. This will be used to match the incoming request URI.
  • replacement – If the reqeust URI matches the reg-ex, then Nginx will use this replacement string to change the request URI accordingly
  • flag – This will decide whether further process of the rewrite directives is required or not. This is explained in details in one of the examples below.
In nginx, the rewrite directive can be specified inside any one of the following three contexts: server, location, if

1. Nginx Rewrite Example Using $1, $2, ..

The following is an example of Nginx rewrite directive:
rewrite ^(/data/.*)/geek/(\w+)\.?.*$ $1/linux/$2.html last;
For example:
  • url/data/distro/geek/test.php will get rewritten as url/data/distro/linux/test.html
  • In this example, when you call the original URL with test.php from the browser, it will get rewritten based on the above rewrite rule and will serve test.html page from /data/distro/linux/
In the above rewrite rule:
  • $1 and $2 will capture the appropriate strings from the original URL that doesn’t change
  • $1 in the replacement string will match whatever is inside the 1st parenthesis ( ) in the reg-ex. In our example, $1 is /data/
  • Similarly $2 will match whatever is inside the 2nd parenthesis ( ) in the reg-ex. So, $2 is (\w+), which is any word that comes after the /geek/ in the original URL. In our example, $2 is test
  • last – This flag will make sure to stop the search of rewrite directive in the current location or block and use the changed URI (i.e rewritten URI) and look for new location for any further rewrite directives that matches.
  • *$ – This indicates the extension in the original URL. Please note that here, the extension from the original URL will be replaced by .html in the replaced URL by rewrite. So, even though you call .php in the original URL, it will only serve the .html file in the rewritten URL.
While Nginx rewrite rules does similar things like Apache, there are still lot of differences in terms of how you write a rewrite rule in Nginx.
Also, if you are new to Nginx, this might help to understand the basics: Nginx Vs Apache: Nginx Basic Architecture and Scalability

2. Creating Controller File Using Nginx Rewrite

Using rewrite, you can route many incoming original URL to a master controller template that will serve those request.
The following rewrite example explains this.
rewrite ^/linux/(.*)$ /linux.php?distro=$1 last;
In the above example, when you call thegeekstuff.com/linux/centos URL, it will get rewritten using the above rule and it will serve the page with this rewritten URL: thegeekstuff.com/linux.php?distro=centos
As you see above, any URL that has matches the pattern here (i.e /linux/ in the URL) will be served by linux.php, but the last portion in the original incoming URL will be used as an value for the distro argument in the linux.php controller.
So, the above rewrite rule will transform the incoming URL like this:
  • linux/centos becomes linux.php?distro=centos
  • linux/debian becomes linux.php?distro=debian
  • linux/redhat becomes linux.php?distro=redhat
  • etc.
Similar to previous example, we are using $1 in the replacement string to capture anything that is inside the 1st parenthesis ( ) in the reg-ex. In this case, this is the last part of the original incoming URL.
We are also using the last flag here to instruct nginx to stop search for further rewrite directives in the current-block and move-on to the next matching location for further search.

3. Rewrite Break Flag in Location Context

In this example, we’ve placed the rewrite condition inside location directive.
In this example, the location directive is /data/, which also matches the $1 in the replacement string given below.
location /data/ {
    rewrite ^(/data/.*)/geek/(\w+)\.?.*$ $1/linux/$2.html break;
    return  403;
}
This is what would’ve happened if you used “last” flag above:
  • So, if you had “last” as the flag, after the initial rewrite of the URL, Nginx will typically look for the next rewrite directive for the new URL.
  • In that case, Nginx will keep redirecting to the same location data and keep processing the same rewrite rule for maximum of 10 times, and finally it will return the 500 error code.
Since, we don’t want the above behavior, we’ve used “break” as the flag here which will just stop processing the rewrite blocks any further.
To use rewrite directive effectively inside location context, you need to understand the details of how location works: 13 Nginx Location Directive Examples including Regular Expression Modifiers

4. Adding Question Mark to Nginx Rewrite Replacement String

If a replacement string includes the new request arguments, the previous request arguments are appended after them. If you don’t want this behavior, putting a question mark at the end of a replacement string avoids having them appended.
In the following example, in the replacement string portion there is no question mark at the end. i.e No question mark after $1
rewrite ^/linux/(.*)$ /linux.php?distro=$1 last;
In the above example, when the replacement string include the incoming request arguments, then the arguments from the previous request are appended after them.
Some times, you probably don’t want that append to happen. In that case, use ? as shown below.
In the following example, in the replacement string portion of the Nginx rewrite, we’ve added ? at the end. i.e There is a question mark after $1
rewrite ^/linux/(.*)$ /linux.php?distro=$1? last;
In the above example, replacement string include the incoming request arguments, then the arguments from the previous request are NOT appended after them.

5. If Context and Rewrite Directive

The following few examples illustrates that we can use rewrite inside the if directive.
You can do a conditional rewrite based by doing some if condition comparison using variables like $scheme, $http_host, $http_user_agent, etc, as shown below:
if ($scheme = "http") {
  rewrite ^ https://www.thegeekstuff.com$uri permanent;
}

if ($http_host = thegeekstuff.com) {
  rewrite  (.*)  https://www.thegeekstuff.com$1;
}

if ($http_user_agent = MSIE) {
    rewrite ^(.*)$ /pdf/$1 break;
}
Please note that there are better ways to achieve the end-result of the above examples. The above examples are just given to show that we can add rewrite directive inside if statement in the nginx config file.
Please note that you can also set the value of the following two parameters to either on or off in your nginx config file:
server_name_in_redirect on 
port_in_redirect off

6. Nginx Rewrite Flags Examples

The following are the 4 different Nginx Rewrite directive flags that you can use.
last: This flag will stop the processing of the rewrite directives in the current set, and will start at the new location that matches the changed URL.
rewrite ^(/data/.*)/geek/(\w+)\.?.*$ $1/linux/$2.html last;
break: This flag will stop the processing of the rewrite directives in the current set.
rewrite ^(/data/.*)/geek/(\w+)\.?.*$ $1/linux/$2.html break;
redirect: This flag will do a temporary redirection using 302 HTTP code. This is mainly used when the replacement string is not http, or https, or $scheme
permanent: This flag will do a permanent redirection using 301 HTTP code
rewrite ^ https://www.thegeekstuff.com$uri permanent;

7. Capture Nginx Rewrite Hits in Error Log File

By default, anytime Nginx does successful rewrite, it doesn’t log it in the error.log.
Initially when you are writing complex rewrite rules, you really want to make sure that Nginx is doing the rewrite as per your requirement.
For this, you should enable the rewrite log, which will write a log entry anytime nginx does a successful rewrite using any one of the rewrite directive in the configuration file.
For this, use the rewrite_log directive and set it to on.
Add the following two lines to your nginx default.conf:
error_log /var/log/nginx/error.log notice;
rewrite_log on;
In the above:
  • The first line indicates the location of the error_log file where we want to write the rewrite messages. Please note that a rewrite message is of type notice. So, you have to add “note” at the end of this line as shown above.
  • rewrite_log on – This line enables logging of all the directives of ngx_http_rewrite_module modules to the error_log file.
After the above change, you’ll started seeing lines like this which clearly shows which specific rewrite rule was used in translating the incoming URL. This also will show the final translated URL in the log entry.
[notice] 14385#14385: *1 "^(/data/.*)/geek/(\w+)\.?.*$" matches "/data/distro/geek/test", client: 192.168.101.1, server: localhost, request: "GET /data/distro/geek/test HTTP/1.1", host: "192.168.101.10"
[notice] 14385#14385: *1 rewritten data: "/data/distro/linux/test.html", args: "", client: 192.168.101.1, server: localhost, request: "GET /data/distro/geek/test HTTP/1.1", host: "192.168.101.10"
In the above:
  • The 1st line shows two things 1) Incoming URL 2) Rewrite rule used
  • In the 1st line, it shows the incoming URL (i.e the request). In this example, the request is: “GET /data/distro/geek/test”
  • In the 1st line, it also shows the Nginx rewrite rule that matched this incoming request. In this example, the rewrite rule used by nginx is: “^(/data/.*)/geek/(\w+)\.?.*$”
  • In the 2nd line, it shows the rewritten translated URL that was used by Nginx after applying the rewrite rule. In this example, the translated rewritten URL is: /data/distro/linux/test.html