Source
The RPM database is made up of files under the /var/lib/rpm/ directory in CentOS and other enterprise Linux distributions such as RHEL, openSUSE, Oracle Linux and more.
If the RPM database is corrupted, RPM will not work correctly, thus updates cannot be applied to your system, you encounter errors while updating packages on your system via YUM package manager. The worst case scenario is being unable to run any rpm and yum commands successfully.
Read Also: 20 Practical Examples of RPM Command in Linux
There are a number of factors that can lead to the RPM database corruption, such as incomplete previous transactions, installation of certain third-party software, removing specific packages, and many others.
In
this article, we will show how to rebuild a corrupted RPM database; this
way you can recover from an RPM database corruption in CentOS. This
requires root user privileges, otherwise, use the sudo command to gain those privileges.
 Next, verify the integrity of the master package metadata file /var/lib/rpm/Packages; this is the file that needs rebuilding, but first remove /var/lib/rpm/__db* files to prevent stale locks using following commands.
 In case the above operation fails, meaning you still encounter
errors, then you should dump and load a new database. Also verify the
integrity of the freshly loaded Packages file as follows.
In case the above operation fails, meaning you still encounter
errors, then you should dump and load a new database. Also verify the
integrity of the freshly loaded Packages file as follows.
 Now to check the database headers, query all installed packages using the
You can install it from source; download the source tree and install it using setup.py (which should grab the psutil dependency from pypi as well), as shown.
dcrpm Github repository: https://github.com/facebookincubator/dcrpm
You can find more information from RPM database recovery page.
That’s all! In this article, we have explained how to rebuild a corrupted RPM database in CentOS. To ask any questions or share your thoughts about this guide, use the feedback form below.
The RPM database is made up of files under the /var/lib/rpm/ directory in CentOS and other enterprise Linux distributions such as RHEL, openSUSE, Oracle Linux and more.
If the RPM database is corrupted, RPM will not work correctly, thus updates cannot be applied to your system, you encounter errors while updating packages on your system via YUM package manager. The worst case scenario is being unable to run any rpm and yum commands successfully.
Read Also: 20 Practical Examples of RPM Command in Linux
There are a number of factors that can lead to the RPM database corruption, such as incomplete previous transactions, installation of certain third-party software, removing specific packages, and many others.
Rebuild Corrupted RPM Database in CentOS
First start by backing up your current RPM database before proceeding (you might need it in the future), using the following commands.# mkdir /backups/ # tar -zcvf /backups/rpmdb-$(date +"%d%m%Y").tar.gz /var/lib/rpm
Backup RPM Database
# rm -f /var/lib/rpm/__db*
# /usr/lib/rpm/rpmdb_verify /var/lib/rpm/Packages
Verify RPM Database
# cd /var/lib/rpm/
# mv Packages Packages.back
# /usr/lib/rpm/rpmdb_dump Packages.back | /usr/lib/rpm/rpmdb_load Packages
# /usr/lib/rpm/rpmdb_verify Packages
Dump and Load RPM Database
-q and -a flags, and try to carefully observe any error(s) sent to the stderror.# rpm -qa >/dev/null #output is discarded to enable printing of errors onlyLast but not least, rebuild the RPM database using the following command, the
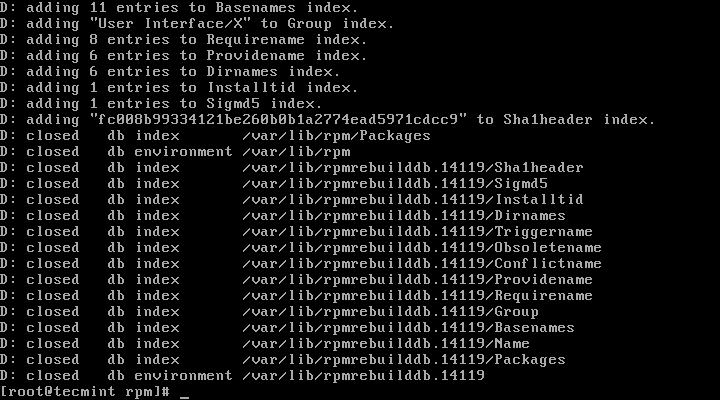
-vv option allows for displaying lots of debugging information.# rpm -vv --rebuilddb
Rebuild RPM Database
Use dcrpm Tool to Detect and Correct RPM Database
We also discovered the dcrpm (detect and correct rpm) command line tool used to identify and correct well known issues to do with RPM database corruption. It is a simple and easy-to-use tool which you can run without option. For effective and reliable usage, you should run it regularly via cron.You can install it from source; download the source tree and install it using setup.py (which should grab the psutil dependency from pypi as well), as shown.
# git clone https://github.com/facebookincubator/dcrpm.git
# cd dcrpm
# python setup.py install
Once you have installed dcrpm, run it as shown.
# dcrpmFinally, try to run your failed rpm or yum command again to see if everything is working fine.
dcrpm Github repository: https://github.com/facebookincubator/dcrpm
You can find more information from RPM database recovery page.
That’s all! In this article, we have explained how to rebuild a corrupted RPM database in CentOS. To ask any questions or share your thoughts about this guide, use the feedback form below.
