четверг, 19 января 2017 г.

How to automatically execute shell script at startup boot on systemd Linux

Source. Thanks to author.

The following config will discuss a basic example on how to execute shell script during a boot time on systemd Linux. There maybe various reason why you might want to execute shell script during Linux startup like for example to start a particular custom service, check disk space, create a backup etc.

The following example below will serve as a basic template to be later modified to suit your specific needs. In the example below we will check a disk space of a /home/ directory during a boot time and write a report to /root/ directory.

Systemd service unit

First, we need to create a systemd startup script eg.disk-space-check.serviceand place it into /etc/systemd/system/ directory. You can find the example of such systemd startup script below:
[Unit]
After=mysql.service

[Service]
ExecStart=/usr/local/bin/disk-space-check.sh

[Install]
WantedBy=default.target
  • After: Instructs systemd on when the script should be run. In our case the script will run after mysql database has started. Other example could be network.target etc.
  • ExecStart: This field provides a full path the actual script to be execute
  • WantedBy: Into what boot target the systemd unit should be installed
The above is an absolute minimum that our systemd service unit should contain in order to execute our script at the boot time. For more information and options to be used see systemd.service manual page:
$ man systemd.service

Startup shell script

Next, we create our custom shell script to be executed during systemd startup. The location and script name is already defined by service unit as /usr/local/bin/disk-space-check.sh. The content of the script can be simple as:
#!/bin/bash

date > /root/disk_space_report.txt
du -sh /home/ >> /root/disk_space_report.txt

Configure and Install

Before we reboot our system we need to make our script executable:
# chmod 744 /usr/local/bin/disk-space-check.sh
Next, install systemd service unit and enable it so it will be executed at the boot time:
# chmod 664 /etc/systemd/system/disk-space-check.service
# systemctl daemon-reload
# systemctl enable disk-space-check.service
Created symlink from /etc/systemd/system/default.target.wants/disk-space-check.service to /etc/systemd/system/disk-space-check.service.
If you wish to test your script before you reboot run:
# systemctl start disk-space-check.service
# cat /root/disk_space_report.txt 
Thursday 7 July  11:30:25 AEST 2016
1.5G    /home/
All ready. After rebooting your Linux system the above systemd unit will invoke shell script to be executed during the boot time.

четверг, 1 декабря 2016 г.

GRAYLOG, настройка.

Источник, спасибо автору

Вместо введения: Graylog это open source программное обеспечение, предназначенное для сбора логов в гигантских сетях их огромного количества источников различными способами. В нем можно удобно организовать сбор событий, фильтрацию, поиск, автоматизацию (всякие алерты) и т.д. Аналогичных средств множество, но Graylog предлагает нереальную производительность с использованием современных компонентов, удобную аналитику и красивый интерфейс.
Для работы ему нужна Java, конфигурацию он будет хранить в MongoDB, для поиска и хранения логов — использовать ElasticSearch. Про сбор информации из WIndows будет ниже, но спойлер — агенту больше не нужна Java.
 
Вторая часть: настройка приема логов в Graylog из Linux. (видеоинструкция)

В консоль сервера приема логов нам больше попадать не нужно. Идем в веб-морду и создаем Input для логов. Расписывать навигацию по веб-интерфейсу дело гиблое, потому есть видео. Если кратко:
  • в меню «Система» создается UDP Input;
  • указывается syslog udp;
  • указывается порт (по умолчанию 512, но чтобы graylog мог использовать порты ниже 1024 нужно много возьни), поэтому, например 1234;
  • указывается адрес для прослушивания входящих сообщений, у меня 10.0.1.10;
  • нажимаем Launch.

Для проверки работы Input можно в консоли того же сервера graylog выполнить
echo "Hello Graylog" | nc -w 1 -u 10.0.1.10 1234
и посмотреть в веб-интерфейсе сообщения, полученные на Input.

Конфигурация машин Linux на отправку логов, в принципе проста. Почти везде релизы syslogd ведут себя одинаково. Кто ничего не помнит о демонах журналирования — освежите память у меня на канале. Итак debian и redhat.
Создается файл задания rsyslog:
 sudo vi /etc/rsyslog.d/90-graylog2.conf

c текстом (адрес и порт взят из настроенного Input):
$template GRAYLOGRFC5424,"<%PRI%>%PROTOCOL-VERSION% %TIMESTAMP:::date-rfc3339% %HOSTNAME% %APP-NAME% %PROCID% %MSGID% %STRUCTURED-DATA% %msg%\n"
*.* @10.0.1.10:1234;GRAYLOGRFC5424


Демон журналов перезапукается командой
sudo service rsyslog restart
(ну или как там в вашей ОС).
И можно смотреть в веб-интерфейсе Graylog полученные сообщения.

Третья часть: настройка приема логов в Graylog из Windows. (видеоинструкция)

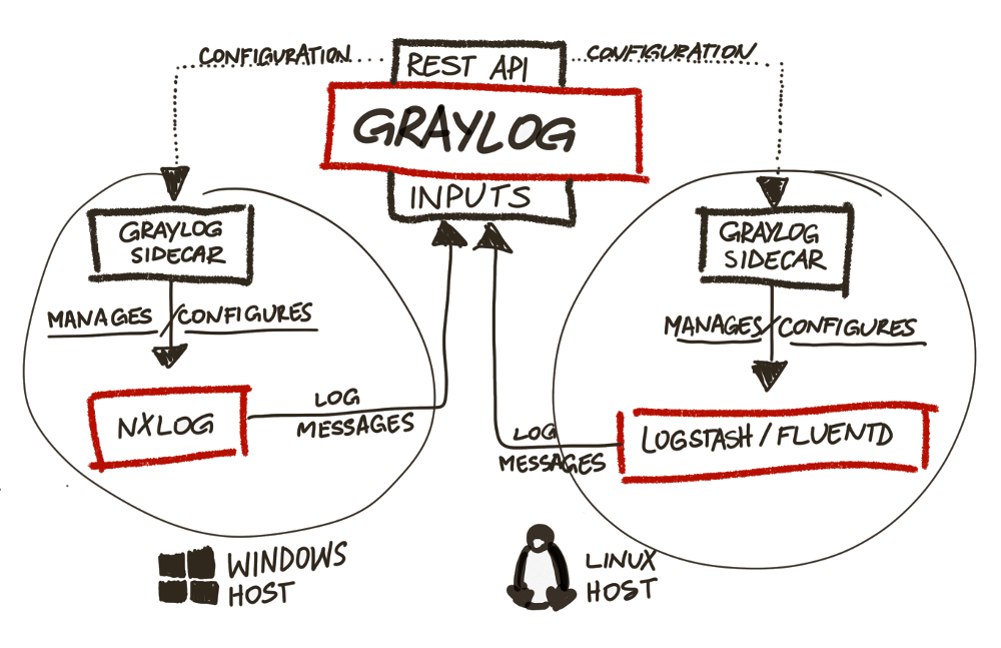
В версиях Graylog младше второй использовался graylog collector на java. Во второй (актуальной) он просто игнорируется и дает ошибки (полдня пытался починить, пока не понял это). Вместо него используется graylog sidecar, который получает конфиг с сервера Graylog (что очень удобно, так как нет необходимости лазить по виндовым серверам для редактирования настроек) и передает его в nxlog (или что вам больше нравится), который события собирает и отправляет.
image

Для приема сообщений из Windows надо создать отдельный Input через веб-интерфейс:
  • выбираем GELF UDP;
  • указываем узел, айпишник сервера graylog;
  • запоминаем или редактируем порт приема сообщений (по умолчанию 12201).


Для создания конфигурации отправки логов для nxlog на винде, нужно создать коллектор через веб-интерфейс в graylog:
  • выбираем Collectors;
  • выбираем Manage Configuration;
  • создаем конфигурацию;
  • указываем метку (именно по метке sidecar на windows поймет какую конфигурацию для nxlog ему скачивать к себе на машину);
  • создаем Output для nxlog (в котором просто указываем настройки Input из предыдущего шага: GELF UDP Output, ip, порт);
  • создаем Input для nxlog (указываем простейший вариант: Windows Event Log).


Отправляемся в Windows, Скачиваем и устанавливаем nxlog и graylog-sidecar.
Убираем как службу nxlog, и ставим как службу sidecar:
'C:\Program Files (x86)\nxlog\nxlog.exe' -u
'C:\Program Files (x86)\graylog\collector-sidecar\graylog-collector-sidecar.exe' -service install


Редактируем файл конфигурации Sidecar (C:\Program Files (x86)\graylog\collector-sidecar\collector_sidecar.yml), а именно указываем порт прослушки глобальный (12900), ip сервера, и самое главное: метку, по которой будет принят конфиг. У меня это выглядит так:
server_url: http://10.0.1.10:12900
node_id: graylog-collector-sidecar
collector_id: file:C:\Program Files (x86)\graylog\collector-sidecar\collector-id
tags: windows
log_path: C:\Program Files (x86)\graylog\collector-sidecar
update_interval: 10
backends:
- name: nxlog
enabled: true
binary_path: C:\Program Files (x86)\nxlog\nxlog.exe
configuration_path: C:\Program Files (x86)\graylog\collector-sidecar\generated\nxlog.conf


Запускаем sidecar 'C:\Program Files (x86)\graylog\collector-sidecar\graylog-collector-sidecar.exe' -service start

Создаем событие eventcreate /l Application /t INFORMATION /id 1 /d “Suck it”

Смотрим логи в его директории (C:\Program Files (x86)\graylog\collector-sidecar\), и если все ок — отправляемся в веб-морду смотреть логи винды на инпуте.

Нюансы:
  1. бывает что файл конфига нужно создать вручную пустой C:\Program Files (x86)\graylog\collector-sidecar\generated\nxlog.conf;
  2. бывает что нужно перезапустить винду, чтобы все сервисы все схватили;
  3. у меня был косяк с опечаткой в названии метки, убил час, разбираясь;
  4. сама метка должна отметиться в веб-интерфейсе в рамочку, иначе это не метка.


Ну а дальше уже начинается работа в веб-интерфейсе: какие именно логи откуда брать, как на какие события реагировать, что отфильтровывать и т.д. Начнете копать — разберетесь. Вот на всякий случай еще раз мануал.

среда, 12 октября 2016 г.

Docker, передача параметров демону в ubuntu / debian

Источник

After a look around at the configuration files in /lib/systemd/system/, it seems that the Docker configuration file (/lib/systemd/system/docker.service) is not using /etc/default/docker at all.

  The problem is solved by adding an EnvironmentFile directive and modifying the command line to include the options from the file, e.g.
 
[Unit]
Description=Docker Application Container Engine
Documentation=http://docs.docker.com
After=network.target docker.socket
Requires=docker.socket

[Service]
EnvironmentFile=-/etc/default/docker
ExecStart=/usr/bin/docker -d $DOCKER_OPTS -H fd://
MountFlags=slave
LimitNOFILE=1048576
LimitNPROC=1048576
LimitCORE=infinity

[Install]
WantedBy=multi-user.target 
 
You have to edit /lib/systemd/system/docker.service to look like the above, 
run systemctl daemon-reload, and then restart the Docker service. 

четверг, 29 сентября 2016 г.

postfix-policyd-spf-python

Источник, спасибо автору.

  • Устанавливаем необходимые пакеты:
    # aptitude install postfix-policyd-spf-python
  • Добавляем в /etc/postfix/main.cf
    policy-spf_time_limit = 3600s
    Далее ищем объявление smtpd_recipient_restrictions и добавляем в него (после reject_unauth_destination) строку check_policy_service unix:private/policy-spf.
    ...
     reject_unauth_destination
     check_recipient_access hash:/etc/postfix/roleaccount_exceptions
     reject_non_fqdn_hostname
     check_helo_access pcre:/etc/postfix/pcre_helo_checks.cf
     check_sender_mx_access cidr:/etc/postfix/cidr_mx_access
     check_policy_service unix:private/policy-spf
     permit
  • Переходим к файлу /etc/postfix/master.cf: в него добавляем следующую строку:
    policy-spf  unix  -       n       n       -       0       spawn
      user=nobody argv=/usr/bin/policyd-spf /etc/postfix-policyd-spf-python/policyd-spf.conf
  • Дополнительные настройки в файле /etc/postfix-policyd-spf-python/policyd-spf.conf и описания настроек в файле policyd-spf.conf.commented.
    policyd-spf.conf
    #  For a fully commented sample config file see policyd-spf.conf.commented
     
    debugLevel = 1
    # Этот параметр определяет, отбрасывать ли действительно письма,
    # если они нарушают SPF, или просто писать об этом в логи и пропускать
    defaultSeedOnly = 1
     
    HELO_reject = SPF_Not_Pass
    # SPF_Not_Pass =
    # Отбрасываем все сообщения, кроме:
    # 1. которые прошли SPF-валидацию
    # 2. В домене нет SPF записи
    # 3. Произошла временная ошибка (DNS упал?)
    Mail_From_reject = Fail
     
    PermError_reject = False
    # При наличии ошибок при проверке пропускаем почту
    TempError_Defer = False
     
    # перечисляйте IPs без пробелов
    skip_addresses = 127.0.0.0/8,::ffff:127.0.0.0/104,::1,10.26.95.0/24
     
    #  Domain_Whitelist: List of domains whose sending IPs (defined by passing
    #  their SPF check should be whitelisted from SPF.
    #  Example (default is no domain whitelist):
    Domain_Whitelist = example1.com,example2.com
    Для дополнительно информации читаем справку
    man policyd-spf.conf
Для применения изменений в файле policyd-spf.conf обязательно перегрузите postfix
# service postfix restart

четверг, 22 сентября 2016 г.

Openfire. Howto get message history from database

1) PostgreSQL
 SELECT
'1970-01-01 00:00:00 GMT'::timestamp with time zone + ((ofmessagearchive.sentdate/1000)::text)::interval AS time,
ofmessagearchive.fromjid AS from,
ofmessagearchive.tojid AS to,
ofmessagearchive.body AS message
FROM
public.ofmessagearchive
WHERE
( ofmessagearchive.fromjid = '<JID of user>'
OR
ofmessagearchive.tojid = '<JID of user>' )
AND
ofmessagearchive.sentdate > EXTRACT(EPOCH FROM timestamp with time zone 'start time in format <YYYY-MM-DD HH-MM-SS>') * 1000
AND
ofmessagearchive.sentdate < EXTRACT(EPOCH FROM timestamp with time zone 'end time in format <YYYY-MM-DD HH-MM-SS>') * 1000
ORDER BY 1;

четверг, 25 августа 2016 г.

How to Recover from a Lost SA Password in SQL Server 2012

Source.

Working at Microsoft provides many opportunities to receive pearls of wisdom from individuals at other parts of the organization.  Saleem Hakani sent along this little gem a few days ago and I wanted to share it with you.  It outlines how to recover an SA password if you forgot it – though you do need to shutdown your SQL Server instance and start it in maintenance mode to accomplish this. 
What I have done in the past as well is recommend  that customers write the SA password down, put it in an envelope and put that envelope in a safe that requires two people to get authorized access to.  This way no one person can get the SA password (two are required) and you don’t need to shut down the server to get it, if needed.
Enjoy!

Here’s the scenario:

You are a proud and a trusted DBA of your organization who is responsible for some important services running on SQL Servers in the production environment. To prevent any unauthorized access to your production environment, you have decided to perform the following steps that are kind of best practices to secure your company’s SQL Servers from any unauthorized access:

þ  You have removed any and all built-in administrators account from SQL Server logins.
þ  You have removed all users (except SA) that were part of SYSADMIN server role (Including any Windows Accounts and/or SQL Server logins)
þ  You have set the password of SA account to something extremely complex which would be hard for anyone to guess or remember.
þ  For day-to-day operations on SQL Server, you use your domain user account which has DBO permissions on user databases but doesn’t have SYSADMIN privileges on the system.
þ  You have not documented the SA password anywhere to prevent others from knowing the SA password. (Also, it’s not a good practice to document the password)

Since you have set the SA password to be complex and you have been using your domain account and not the SA account for all your daily database related activity on SQL Server, the unthinkable has happened “you forgot your SQL Server’s SA password”. You are the only person who knew the SA password in your team and now you don’t remember what it was and you need to make some server level configuration changes to your production SQL Server boxes.

What would you do now? Here are some of the options I think you may do:
1.       You will try logging in as SA with all possible passwords you have in your mind.
2.       You will look for the SA password on your computer hard-drive or in your emails (If you had stored it in some file which is a bad practice)
3.       Try to restore MASTER database from database backup. However, this will not help because you will run in to the same issue as you don’t remember the SA password.
4.       Rebuild Master database. This may not help as you will lose all system/server level configurations and settings including logins, permissions and any server level objects.
5.       Re-install SQL Server 2012 and attach all user databases. This may not work as you may experience same issues that you would experience with #4.

All your attempts to login in to the system using SA password have failed and now it is time for you to call up the world’s best product support services team “Microsoft PSS”

Here’s what you can do:
Many folks have asked me about this and today, I’d like to share with you a backdoor to SQL Server 2012 which would help you gain SYSADMIN access to your production SQL Servers. However, that would mean your Windows account will need to be a member of the local administrators group on Windows Servers where SQL Server 2012 Services are running.

SQL Server allows any member of Local Administrators group to connect to SQL Server with SYSADMIN privileges.

Steps to take control of your SQL Server 2012 as an SA:

1.       Start the SQL Server 2012 instance using single user mode from command prompt by launching  the command prompt as an administrator. (Note: You can also start SQL Server 2012 using minimal configuration which will also put SQL Server in single user mode)

2.       From the command prompt (Run as Administrator) type: SQLServr.Exe –m (or SQLServr.exe –f) and let the SQL Server 2012 database engine start. Make sure you do not close this command prompt window.

You can locate SQLServr.exe in the Binn folder of your environmental path. If you don’t have SQL Server 2012 Binn folder in your environmental path, you can always navigate to the Binn folder of your SQL Server 2012 machine. Usually the Binn folder is located @ C:\Program Files\Microsoft SQL Server\MSSQL11.MSSQLSERVER\MSSQL\Binn>

3.       Once SQL Server 2012 service has been started in single user mode or with minimal configuration, you can now open up another command line window as an administrator and use SQLCMD command from command prompt to connect to SQL Server 2012 instance:

SQLCMD –S <Server_Name\Instance_Name>

Example:
SQLCMD –S “SALEEMHAKANI”


You will now be logged in to SQL Server. Keep in mind that you are now logged in as an Admin on SALEEMHAKANI SQL Server 2012 instance.

4.       Once you are logged into the SQL Server 2012 using SQLCMD from the command prompt, you have the option of creating a new account and granting it any server level permission.

Let’s create a new login in SQL Server 2012 called “Saleem_SQL” and then add this account to SysAdmin server role.

To create a new login from the command prompt after performing Step 3:
1> CREATE LOGIN ‘<Login_Name>’ with PASSWORD=’<Password>’
2> GO

Example:
1>     CREATE LOGIN SQL_SALEEM WITH PASSWORD=’$@L649$@m’
2>     GO

To Once the new login “SQL_SALEEM” has been created, now let’s add this login to System Admin server role on SQL Server 2012 instance.

From the same command prompt window, execute the following statement:

1> SP_ADDSRVROLEMEMBER ‘<Login_Name>’,’SYSADMIN’
2>go
Example:
1>     SP_ADDSRVROLEMEMBER SQL_SALEEM,’SYSADMIN’
2>     GO

The above operation will take care of granting SYSADMIN privileges to “SQL_SALEEM” login.

5.       Once the above steps are successfully performed, the next step is to stop and start SQL Server services using regular startup options. (This time you will not need –f or –m)

6.       Log in to the SQL Server 2012 management studio or from the command prompt using “SQL_SALEEM” account and it’s respective password, you now have system admin access to your SQL Server 2012 instance. You may now reset the SA password and take control of your production SQL Server boxes.

How To Free Reserved Space On EXT4 Partitions

Source.

This one came in handy when I bought a 1TB hard drive last week. Most linux distributions reserve 5% of new partitions for the root user and system services. The idea here is even when you run out of disk space, the root user should still be able to log in and system services should still run… this won’t happen if there is no space on the root partition. This policy may have been appropriate in the 90s when hard disk capacities were relatively low but this is 2010 and one can get a 1TB hard drive for a couple of hundred Ghana Cedis. 5% of that is about 51GB and those system services need only a couple of hundred megabytes.
So I decided to reclaim all that disk real estate with this command:

sudo tune2fs -m 0 /dev/sdb1

This sets the reserved blocks to 0%. This is an additional storage drive, I have no need to reserve disk space for system services. You can verify that this actually worked with:

sudo tune2fs -l /dev/sdb1 | grep ‘Reserved block count’
As usual, modify /dev/sdb1 to suit your partition setup. Have fun.