вторник, 22 ноября 2022 г.

Convert a X.509 Certificate from Metadata

 Source

There are times that you might need to provide or have access to a X.509 certificate to verify the validity of a signed key or some other piece of data. X.509 Certificates are a standard for public key certificates and are often used to validate signatures on tokens and assertions used during user authentication, for example, when authenticating using SAML (Security Assertion Markup Language).

Recently, I needed to provide an X.509 certificate, provided by an Identity Provider, Azure AD, to an authorization service provider, Auth0. Since the X.509 certificate is a public format, the identity provider makes the certificate available in a long string format from their Federation Metadata Document, which is an .xml file publicly available. The format for the X.509 certificate provided by Azure was encoded in a base64 format, which was not accepted as is by Auth0, I needed to do some conversion prior to uploading to Auth0.

The following are steps taken to obtain and transform the X.509 certificate into a usable format across parties, (not all steps might be necessary for your use case):

  1. Obtain the X.509 certificate from the Identity Provider

Azure presents the X.509 certificate in the Federation Metadata Document which is a publicly available .xml document. In the metadata, there might be more than one X.509 certificate defined, this is because the certificates have differing expiration dates. If one certificate has expired, an application could then try to use another X.509 defined in the metadata for their validation needs.

Example .xml certificate

1
2
3
4
5
6
7
8
9
10
11
<KeyDescriptor use="signing">
<KeyInfo xmlns="http://www.w3.org/2000/09/xmldsig#">
<X509Data>
<X509Certificate>
MIIDBTCCAe2gAwIBAgIQWPB1ofOpA7FFlOBk5iPaNTANBgkqhkiG9w0BAQsFADAtMSswKQYDVQQDEyJhY2NvdW50cy5hY2Nlc3Njb250cm9sLndpbmRvd3MubmV0MB4XDTIxMDIwNzE3MDAzOVoXDTI2MDIwNjE3MDAzOVowLTErMCkGA1UEAxMiYWNjb3VudHMu
....
bmMCnFWuNNahcaAKiJTxYlKDaDIiPN35yECYbDj0PBWJUxobrvj5I275jbikkp8QSLYnSU/v7dMDUbxSLfZ7zsTuaF2Qx+L62PsYTwLzIFX3M8EMSQ6h68TupFTi5n0M2yIXQgoRoNEDWNJZ/aZMY/gqT02GQGBWrh+/vJ
</X509Certificate>
</X509Data>
</KeyInfo>
</KeyDescriptor>

  1. Copy/Paste value of <X509Certificate>…</X509Certificate>

To get the certificate into format we can work with, copy/paste the value in between the <X509Certificate> .xml elements into a new .crt file.

A valid .crt certificate file contains a BEGIN and END certificate declaration. Your file should look something like this:

Example .crt file

1
2
3
4
5
-----BEGIN CERTIFICATE-----
MIIDBTCCAe2gAwIBAgIQWPB1ofOpA7FFlOBk5iPaNTANBgkqhkiG9w0BAQsFADAtMSswKQYDVQQDEyJhY2NvdW50cy5hY2Nlc3Njb250cm9sLndpbmRvd3MubmV0MB4XDTIxMDIwNzE3MDAzOVoXDTI2MDIwNjE3MDAzOVowLTErMCkGA1UEAxMiYWNjb3VudHMu
....
bmMCnFWuNNahcaAKiJTxYlKDaDIiPN35yECYbDj0PBWJUxobrvj5I275jbikkp8QSLYnSU/v7dMDUbxSLfZ7zsTuaF2Qx+L62PsYTwLzIFX3M8EMSQ6h68TupFTi5n0M2yIXQgoRoNEDWNJZ/aZMY/gqT02GQGBWrh+/vJ
-----END CERTIFICATE-----

  1. Make .crt file valid

The current format of the .crt file is not actually a valid certificate format. We need to “fold” the long base64 string into one where each line of the certificate is 64 characters in length. This can be easily done with the fold command.

1
fold -w 64 example.crt > new-example.crt

This command will read our example.crt, perform the fold action to wrap each line after the 64th character, and then write the output to a new file with the new format.

  1. Convert .crt to .pem

Our example.crt might be acceptable, but I’ve found most relying parties need the X.509 certificate in a different format, often a .pem format. To convert the .crt to a .pem format we will use the openssl utility to convert between formats.

1
openssl x509 -in new-example.crt -out example.pem

The converted certificate can now be uploaded to the relying party.

While the steps are a bit manual, they can likely be improved and streamlined with scripting, etc. These certificates are often valid for many years or forever, so this should not be a process that needs to be performed often.

среда, 5 июня 2019 г.

A Read Only Kubernetes Dashboard

Source

the default configuration for the dashboard does not give it permissions to see anything within the cluster. The dashboard page acknowledges this and suggests simply binding the dashboard service account to cluster-admin…YIKES:

---
apiVersion: rbac.authorization.k8s.io/v1beta1
kind: ClusterRoleBinding
metadata:
  name: admin-user
roleRef:
  apiGroup: rbac.authorization.k8s.io
  kind: ClusterRole
  name: cluster-admin
subjects:
- kind: ServiceAccount
  name: admin-user
  namespace: kube-system
 
Ugh! Thats not OK. Better would be a read only user…like the ‘view’ ClusterRole:
But there’s a problem - the view ClusterRole doesn’t actually have permissions for the Cluster level objects like Nodes and Persistent Volume Claims. So we’ll have to create a new RBAC config.

First, we’ll create a new dashboard-viewonly ClusterRole:
 
---
apiVersion: rbac.authorization.k8s.io/v1
kind: ClusterRole
metadata:
  name: dashboard-viewonly
rules:
- apiGroups:
  - ""
  resources:
  - configmaps
  - endpoints
  - persistentvolumeclaims
  - pods
  - replicationcontrollers
  - replicationcontrollers/scale
  - serviceaccounts
  - services
  - nodes
  - persistentvolumeclaims
  - persistentvolumes
  verbs:
  - get
  - list
  - watch
- apiGroups:
  - ""
  resources:
  - bindings
  - events
  - limitranges
  - namespaces/status
  - pods/log
  - pods/status
  - replicationcontrollers/status
  - resourcequotas
  - resourcequotas/status
  verbs:
  - get
  - list
  - watch
- apiGroups:
  - ""
  resources:
  - namespaces
  verbs:
  - get
  - list
  - watch
- apiGroups:
  - apps
  resources:
  - daemonsets
  - deployments
  - deployments/scale
  - replicasets
  - replicasets/scale
  - statefulsets
  verbs:
  - get
  - list
  - watch
- apiGroups:
  - autoscaling
  resources:
  - horizontalpodautoscalers
  verbs:
  - get
  - list
  - watch
- apiGroups:
  - batch
  resources:
  - cronjobs
  - jobs
  verbs:
  - get
  - list
  - watch
- apiGroups:
  - extensions
  resources:
  - daemonsets
  - deployments
  - deployments/scale
  - ingresses
  - networkpolicies
  - replicasets
  - replicasets/scale
  - replicationcontrollers/scale
  verbs:
  - get
  - list
  - watch
- apiGroups:
  - policy
  resources:
  - poddisruptionbudgets
  verbs:
  - get
  - list
  - watch
- apiGroups:
  - networking.k8s.io
  resources:
  - networkpolicies
  verbs:
  - get
  - list
  - watch
- apiGroups:
  - storage.k8s.io
  resources:
  - storageclasses
  - volumeattachments
  verbs:
  - get
  - list
  - watch
- apiGroups:
  - rbac.authorization.k8s.io
  resources:
  - clusterrolebindings
  - clusterroles
  - roles
  - rolebindings
  verbs:
  - get
  - list
  - watch
And then bind it to the service account:
 
---
apiVersion: v1
kind: ServiceAccount
metadata:
  name: kubernetes-dashboard 
  namespace: kube-system 
---
apiVersion: rbac.authorization.k8s.io/v1beta1
kind: ClusterRoleBinding
metadata:
  name: kubernetes-dashboard
  labels:
    k8s-app: kubernetes-dashboard
roleRef:
  apiGroup: rbac.authorization.k8s.io
  kind: ClusterRole
  name: dashboard-viewonly
subjects:
- kind: ServiceAccount
  name: kubernetes-dashboard
  namespace: kube-system

Now we’ve configured a readonly dashboard we can safely share with people that dont even have K8S cluster access (many devs dont - they just push via a CI/CD pipeline). As a side note, this RBAC config does NOT grant access to Secrets, just to be a little safe.

понедельник, 29 апреля 2019 г.

Set AD SPN record for MS SQL service account

 Source
  1. Granting read/write servicePrincipalName permissions to the service account using ADSI Edit, as described in https://support.microsoft.com/en-us/kb/811889
  2. Removing the SPNs that previously existed on the SQL Server computer account (as opposed to the service account) using

    setspn -D MSSQLSvc/HOSTNAME.domain.name.com:1234 HOSTNAME

    where 1234 was the port number used by the instance (mine was not a default instance).
 

пятница, 19 апреля 2019 г.

Linux - Kernel Semaphore parameters

Source

1 - About

On Linux, A semaphore is a System V IPC object that is used to control utilization of a particular process.
Semaphores are a shareable resource that take on a non-negative integer value. They are manipulated by the P (wait) and V (signal) functions, which decrement and increment the semaphore, respectively. When a process needs a resource, a “wait” is issued and the semaphore is decremented. When the semaphore contains a value of zero, the resources are not available and the calling process spins or blocks (as appropriate) until resources are available. When a process releases a resource controlled by a semaphore, it increments the semaphore and the waiting processes are notified.
The Semaphore Kernel parameters
Semaphore Description Minimum
SEMMSL maximum number of semaphores per array 128
SEMMNS maximum semaphores system-wide
SEMOPM maximum operations per semop call
SEMMNI maximum arrays
Advertising

3 - How to

3.1 - Display them ?

This command displays the value of the semaphore parameters:
# /sbin/sysctl -a | grep sem

3.2 - Calculate them ?

  • Calculate the minimum total semaphore requirements using the following formula:
sum (process parameters of all database instances on the system) + system and other application requirements
  • Set semmns (total semaphores systemwide) to this total.
  • Set semmsl (semaphores per set) to 256.
  • Set semmni (total semaphores sets) to semmns / semmsl rounded up to the nearest multiple of 1024.
The following formula can be used as a guide, although in practice, SEMMNS and SEMMNU can be much less than SEMMNI * SEMMSL because not every program in the system needs semaphores.
SEMMNS = SEMMNU = (SEMMNI * SEMMSL)

3.3 - Set them ?

In the file, /etc/sysctl.conf
kernel.sem = 2200 6400 200 25
Where:
kernel.sem = SEMMSL SEMMNS SEMOPM SEMMNI
Then reboot or run this command:
# /sbin/sysctl -p
Advertising

4 - Documentation / Reference

пятница, 8 февраля 2019 г.

Systemd. How to clear journalctl.

Source

1) The self maintenance method is to vacuum the logs by size or time.
Retain only the past two days:
journalctl --vacuum-time=2d
Retain only the past 500 MB:
journalctl --vacuum-size=500M
man journalctl for more information.

 2) You don't typically clear the journal yourself. That is managed by systemd itself and old logs are rotated out as new data comes in. The correct thing to do would be to schedule journald to only keep as much data as you are interested in. The most usual thing to adjust is the total disk space it is allowed to take up. Once it crosses this boundry it will start pitching old entries to stay near this value.
You can set this in /etc/systemd/journald.conf like so:
SystemMaxUse=100M
 
3) To get rid of everything, you need to rotate the files first so that recent entries are moved to inactive files.

So, the complete answer to remove all entries seems to be
journalctl --rotate journalctl --vacuum-time=1s (Note that you cannot combine this into one journalctl command.)
By the way, some distributions have journald configured so that it writes logs to disk (/var/log/journal) while others keep logs in memory (/run/log/journal). I expect that in some cases it may be necessary to use journalctl --flush first to get everything removed.
If you don't have --rotate in your version, you can use the --since argument to filter entries:
--since "2019-01-30 14:00:00" --since today

пятница, 23 ноября 2018 г.

Regex matching in a Bash if statement

 Source
 
#!/bin/bash

# Only continue for 'develop' or 'release/*' branches
BRANCH_REGEX="^(develop$|release//*)"

if [[ $BRANCH =~ $BRANCH_REGEX ]];
then
    echo "BRANCH '$BRANCH' matches BRANCH_REGEX '$BRANCH_REGEX'"
else
    echo "BRANCH '$BRANCH' DOES NOT MATCH BRANCH_REGEX '$BRANCH_REGEX'"
fi

вторник, 23 октября 2018 г.

How to Rebuild Corrupted RPM Database in CentOS

Source

The RPM database is made up of files under the /var/lib/rpm/ directory in CentOS and other enterprise Linux distributions such as RHEL, openSUSE, Oracle Linux and more.
If the RPM database is corrupted, RPM will not work correctly, thus updates cannot be applied to your system, you encounter errors while updating packages on your system via YUM package manager. The worst case scenario is being unable to run any rpm and yum commands successfully.
Read Also: 20 Practical Examples of RPM Command in Linux
There are a number of factors that can lead to the RPM database corruption, such as incomplete previous transactions, installation of certain third-party software, removing specific packages, and many others.
In this article, we will show how to rebuild a corrupted RPM database; this way you can recover from an RPM database corruption in CentOS. This requires root user privileges, otherwise, use the sudo command to gain those privileges.

Rebuild Corrupted RPM Database in CentOS

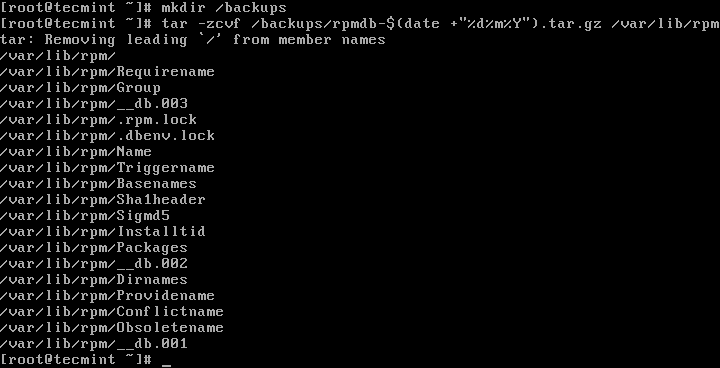
First start by backing up your current RPM database before proceeding (you might need it in the future), using the following commands.
# mkdir /backups/
# tar -zcvf /backups/rpmdb-$(date +"%d%m%Y").tar.gz  /var/lib/rpm
Backup RPM Database
Backup RPM Database
Next, verify the integrity of the master package metadata file /var/lib/rpm/Packages; this is the file that needs rebuilding, but first remove /var/lib/rpm/__db* files to prevent stale locks using following commands.
# rm -f /var/lib/rpm/__db*  
# /usr/lib/rpm/rpmdb_verify /var/lib/rpm/Packages
Verify RPM Database
Verify RPM Database
In case the above operation fails, meaning you still encounter errors, then you should dump and load a new database. Also verify the integrity of the freshly loaded Packages file as follows.
# cd /var/lib/rpm/
# mv Packages Packages.back
# /usr/lib/rpm/rpmdb_dump Packages.back | /usr/lib/rpm/rpmdb_load Packages
# /usr/lib/rpm/rpmdb_verify Packages
Dump and Load RPM Database
Now to check the database headers, query all installed packages using the -q and -a flags, and try to carefully observe any error(s) sent to the stderror.
# rpm -qa >/dev/null #output is discarded to enable printing of errors only
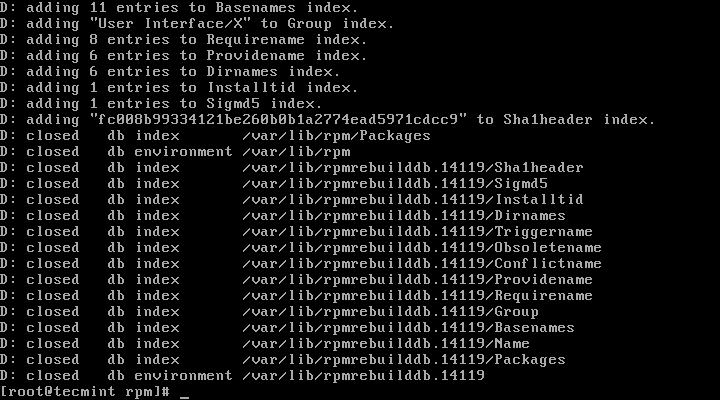
Last but not least, rebuild the RPM database using the following command, the -vv option allows for displaying lots of debugging information.
# rpm -vv --rebuilddb
Rebuild RPM Database

Use dcrpm Tool to Detect and Correct RPM Database

We also discovered the dcrpm (detect and correct rpm) command line tool used to identify and correct well known issues to do with RPM database corruption. It is a simple and easy-to-use tool which you can run without option. For effective and reliable usage, you should run it regularly via cron.
You can install it from source; download the source tree and install it using setup.py (which should grab the psutil dependency from pypi as well), as shown.
# git clone https://github.com/facebookincubator/dcrpm.git
# cd dcrpm
# python setup.py install
Once you have installed dcrpm, run it as shown.
# dcrpm
Finally, try to run your failed rpm or yum command again to see if everything is working fine.
dcrpm Github repository: https://github.com/facebookincubator/dcrpm
You can find more information from RPM database recovery page.
That’s all! In this article, we have explained how to rebuild a corrupted RPM database in CentOS. To ask any questions or share your thoughts about this guide, use the feedback form below.

How to rescan disk in Linux after extending disk

 Source

How to rescan disk in Linux after extending vmware disk


Learn to rescan disk in Linux VM when its backed vdisk in vmware is extended. This method does not require downtime and no data loss.
Rescan disk when vdisk in extended
Re-scan vdisk in Linux


Sometimes we get a disk utilization situations and needs to increase disk space. In vmware environment, this can be done on the fly at vmware level. VM assigned disk can be increased in size without any downtime. But, you need to take care of increasing space at OS level within VM. In such scenario we often think, how to increase disk size in Linux when vmware disk size is increased? or how to increase mount point size when vdisk size is increased? or steps for expanding LVM partitions in vmware Linux guest? or how to rescan disk when vdisk expanded? We are going to see steps to achieve this without any downtime.
In our example here, we have one disk /dev/sdd assigned to VM of 1GB. It is part of volume group vg01 and mount point /mydrive is carved out of it. Now, we will increase size of disk to 2GB at vmware level and then will add up this space in mount point /mydrive.

Step 1:

See below fdisk -l output snippet showing disk /dev/sdd of 1GB size. We have created single primary partition on it /dev/sdd1 which in turns forms vg01 as stated earlier. Always make sure you have data backup in place of the disk you are working on.

Step 2:

Now, change disk size at vmware level. We are increasing it by 1 more GB so final size is 2GB now. At this stage disk need to be re-scanned in Linux so that kernel identifies this size change. Re-scan disk using below command :
Make sure you use correct disk name in command (before rescan). You can match your SCSI number (X:X:X:X) with vmare disk using this method.
Note : Sending “– – -” to /sys/class/scsi_host/hostX/scan is scanning SCSI host adapters for new disks on every channel (first -), every target (second -), and every device i.e. disk/lun (third -) i.e. CTD format. This will only helps to scan when new devices are attached to system. It will not help us to re-scan already identified devices.
Thats why we have to send “1” to /sys/class/block/XYZ/device/rescan to respective SCSI block device to refresh device information like size. So this will be helpful here since our device is already identified by kernel but we want kernel to re-read its new size and update itself accordingly.
Now kernel re-scan disk and fetch its new size. You can see new size is being shown in your fdisk -l output.

Step 3:

At this stage our kernel know new size of disk but out partition (/dev/sdd1) is still of old 1GB size. This left us no choice but delete this partition and re-create it again with full size. Make a note here your data is safe and make sure your (old & new) partition are marked as Linux LVM using hex code  8e or else your will mess up whole configuration.
Delete and re-create partition using fdisk console as below:
All fdisk prompt commands are highlighted in above output. Now you can see new partition /dev/sdd1 is of 2GB size. But this partition table is not yet written to disk. Use w command at fdisk prompt to write table.
You may see warning and error like above. If yes, you can use partprobe -s and you should be good. If you still below error with partprobe then you need to reboot your system (which is sad ).

Step 4:

Now rest of the part should be tackeled by LVM. You need to resize PV so that LVM identify this new space. This can be done with pvresize command.
As new PV size is learned by LVM you should see free/extra space available in VG.
You can see our VG now have 2GB space i.e. what we have resized our disk to! Now you can use this space to create new lvol in this VG or extend existing lvol using LVM commands. Further you can extend filesystem online which is sittign on logical volumes.
You can observe all lvol in this VG will be un-affected by this activity and data is still there as it was previously.
Shell
1
2
3
4
5
6
7
8
 
# ll /mydrive
total 24
drwx------.  2 root root 16384 Jun 23 11:00 lost+found
-rw-r--r--.  1 root root     0 Jun 23 11:01 shri
drwxr-xr-x.  3 root root  4096 Jun 23 11:01 .
dr-xr-xr-x. 28 root root  4096 Jun 23 11:04 ..